Ads

Friday, 30 September 2016

Basic DNS Setup

First things first, let's install the package:
apt-get update
apt-get install dnsmasq
If your goal was to set up a simple DNS server, you just succeeded. To test it, use your favorite DNS lookup tool pointed at localhost:
dig debian.org @localhost
or
nslookup debian.org localhost
By default, DNS is configured to forward all requests to your system's default DNS settings. In case you didn't know, these are stored in the /etc/resolv.conf file. See Debian Reference or the resolv.conf(5) man page for more details.
Now, if you want to add some names for your DNS server to resolve for your clients, simply add them to your /etc/hosts file.

Choosing Your Interfaces

One you will probably want to do is tell dnsmasq which ethernet interface it can and cannot listen on, as we really don't want it listening on the internet. Around line 69 of the/etc/dnsmasq.conf file, you will see:
#interface=
Uncomment the line and specify which ethernet interface(s) you want it server IPs to. For example, if I want it to listen on eth1 (my DMZ) and eth2 (my local network), then it should look like:
interface=eth1
interface=eth2
If I didn't edit this line, it would also listen on eth0, my internet connection. I personally wouldn't recommend this, as it gives those evil guys a few doors to try to break into.

Basic DHCP Setup

By default, DHCP is turned off. This is a good thing, as you could bring down whatever network you are connected to if you are not careful.
To enable it, there is at least one line will need to edit in the /etc/dnsmasq.conf file. Around line 143, you will see:
#dhcp-range=192.168.0.50,192.168.0.150,12h
To enable the DHCP server, you will need to give it a range of IP addresses to hand out. In the example above, this server would hand out 101 address starting at 192.168.0.50 and ending at 192.168.0.150. The last number is how long the DHCP leases are good for. In this example, they would be good for twelve hours.
Since I have two different networks that need DHCP, I'm going to change that line to:
dhcp-range=eth1,192.168.100.100,192.168.100.199,4h
dhcp-range=eth2,192.168.200.100,192.168.200.199,4h
Notice the "eth1" and "eth2" labels in the lines above? The aren't necessary, but definately help once you start playing with more advanced configurations. It also helps me remember which range is which. Now restart your dnsmasq server, connect up a few clients, and see if they autoconfigure themselves:
/etc/init.d/dnsmasq restart

Local Caching

Using dnsmasq to cache DNS queries for the local machine is a bit tricky (unless you're using NetworkManager, see below), since all DNS queries from the local machine need to go to dnsmasq, while as the same time, dnsmasq must be configured to forward all those queries to upstream DNS servers.
  • <!> Do not use this configuration if you use different network (e.g If you use a laptop!)
The dnsmasq(8) man page suggests the following:
  • In order to configure dnsmasq to act as cache for the host on which it is running, put "nameserver 127.0.0.1" in /etc/resolv.conf to force local processes to send queries to dnsmasq. Then either specify the upstream servers directly to dnsmasq using --server options or put their addresses real in another file, say /etc/resolv.dnsmasq and run dnsmasq with the -r /etc/resolv.dnsmasq option. This second technique allows for dynamic update of the server addresses by PPP or DHCP.
There is, however, a simpler method; simply ensure that the machine's list of nameservers contains the line
nameserver 127.0.0.1
as the first line, followed by the upstream nameservers. dnsmasq is smart enough to ignore this line and forward all queries appropriately, while all other applications will send all their queries to dnsmasq.
Exaclty how to do this depends on the method(s) of network configuration in use. If you're manually hardcoding the nameservers (either in /etc/resolv.conf or elsewhere, such as a stanza in /etc/network/interfaces or in the Wicd GUI), then just add a reference to 127.0.0.1 as the first entry in the list. If you're using DHCP, then instruct your client to prepend127.0.0.1 to the DHCP servers it receives. E.g., with dhclient, include the line
prepend domain-name-servers 127.0.0.1;
in the dhclient configuration file (/etc/dhcp3/dhclient.conf). [On my Sid system, the default configuration file shipped with the package contains that line, but commented out.]
Note that if you plan to use dnsmasq for the local system only, you should lock it down by adding the line
listen-address=127.0.0.1
to the dnsmasq configuration file (/etc/dnsmasq.conf).

Local Caching using NetworkManager

Set this in /etc/NetworkManager/NetworkManager.conf:
[main]
dns=dnsmasq
and restart network-manager service.

dnsmasq with dnscrypt-proxy

dnsmasq combined with dnscrypt-proxy provide caching, encryption and server-side authentication. Useful to protect a laptop from potentially hostile networks.

apt-get install dnsmasq dnscrypt-proxy

## Configure /etc/resolv.conf to use dnsmasq
nameserver 127.0.0.1

## Configure /etc/dnsmasq.conf
# ignore resolv.conf
no-resolv
# Listen only on localhost
listen-address=127.0.0.1
# dnscrypt is on port 40
server=127.0.0.1#40

## Configure /etc/systemd/system/sockets.target.wants/dnscrypt-proxy.socket with the following 5 lines if you are using systemd
[Socket]
ListenStream=
ListenDatagram=
ListenStream=127.0.0.1:40
ListenDatagram=127.0.0.1:40

## restart both daemons


Read More

0 comments:

What is Dnsmaq

This description of dnsmasq shamelessly taken from the dnsmasq home page.
dnsmasq is a lightweight DNS, TFTP, PXE, router advertisement and DHCP server. It is intended to provide coupled DNS and DHCP service to a LAN.
Dnsmasq accepts DNS queries and either answers them from a small, local, cache or forwards them to a real, recursive, DNS server. It loads the contents of /etc/hosts so that local hostnames which do not appear in the global DNS can be resolved and also answers DNS queries for DHCP configured hosts. It can also act as the authoritative DNS server for one or more domains, allowing local names to appear in the global DNS.
The dnsmasq DHCP server supports static address assignments and multiple networks. It automatically sends a sensible default set of DHCP options, and can be configured to send any desired set of DHCP options, including vendor-encapsulated options. It includes a secure, read-only, TFTP server to allow net/PXE boot of DHCP hosts and also supports BOOTP. The PXE support is full featured, and includes a proxy mode which supplies PXE information to clients whilst DHCP address allocation is done by another server.
The dnsmasq DHCPv6 server provides the same set of features as the DHCPv4 server, and in addition, it includes router advertisements and a neat feature which allows naming for clients which use DHCPv4 and stateless auto-configuration only for IPv6 configuration. There is support for doing address allocation (both DHCPv6 and RA) from subnets which are dynamically delegated via DHCPv6 prefix delegation.
Dnsmasq is coded with small embedded systems in mind. It aims for the smallest possible memory footprint compatible with the supported functions, and allows unneeded functions to be omitted from the compiled binary.
In short, IT IS EXCELLENT!!

Installing dnsmasq

Installing dnsmasq is just a case of using apt-get.
sudo apt-get install dnsmasq

Setup dnsmasq as DNS DHCP

Looking at the file /etc/dnsmasq.conf first. The lines are listed are those that I changed from their defaults. Just uncomment and amend them as necessary. (Remove the ‘#’ from the beginning of the line).
sudo nano /etc/dnsmasq.conf
domain-needed
bogus-priv
no-resolv
no-poll
server=/example.com/192.168.0.5
server=8.8.8.8
server=208.67.220.220
local=/example.com/
address=/doubleclick.net/127.0.0.1
no-hosts
addn-hosts=/etc/dnsmasq_static_hosts.conf
expand-hosts
domain=example.com
dhcp-range=192.168.0.20,192.168.0.50,72h
dhcp-range=tftp,192.168.0.250,192.168.0.254  
hcp-host=mylaptop,192.168.0.199,36h
dhcp-option=option:router,192.168.0.1
dhcp-option=option:ntp-server,192.168.0.5
dhcp-option=19,0 # ip-forwarding off
dhcp-option=44,192.168.0.5 # set netbios-over-TCP/IP aka WINS
dhcp-option=45,192.168.0.5 # netbios datagram distribution server
dhcp-option=46,8           # netbios node type
What these lines will do for you.
  • domain-needed This tells dnsmasq to never pass short names to the upstream DNS servers. If the name is not in the local /etc/hosts file then “not found” will be returned.
  • bogus-priv All reverse IP (192.168.x.x) lookups that are not found in /etc/hosts will be returned as “no such domain” and not forwarded to the upstream servers.
  • no-resolv Do not read resolv.conf to find the servers where to lookup dns.
  • no-poll Do not poll resolv.conf for changes
  • server=8.8.8.8 Set one or more DNS servers to use when addresses are not local. These are open DNS servers.
  • local=/example.com/ Our local domain, queries in these domains are answered from /etc/hosts or the static-hosts files.
  • address=/doubleclick.net/127.0.0.1 Use this force an address for the specified domains. e.g to block adverts force doubleclck.net to localhost
  • no-hosts This options stops dnsmasq using the local /etc/hosts file as a source for lookups .
  • addn-hosts=/etc/dnsmasq_static_hosts.conf Force dnsmasq to use this file for lookups. It is in the same format as /etc/hosts.
  • expand_hosts So we can see our local hosts via our home domain without having to repeatedly specify the domain in our /etc/hosts file.
  • domain This is your local domain name. It will tell the DHCP server which host to give out IP addresses for.
  • dhcp-range This is the range of IPs that DHCP will serve: 192.168.0.20 to 192.168.0.50, with a lease time of 72 hours. The lease time is how long that IP will be linked to a host. (All most ðŸ™‚ )
  • dhcp-range=tftp,192.168.0.250,192.168.0.255 For tftp connections use this range of IP addresses
  • dhcp-host=mylaptop,192.168.0.199,36h Any machine saying they are hostname = ‘mylaptop’ gets this IP address
  • dhcp-option=option:router,192.168.0.1 When a host is requesting an IP address via DHCP also tell it the gateway to use.
  • dhcp-option=option:ntp-server,192.168.0.5 When a host is requesting an IP address via DHCP also tell it the NTP to use.
  • In the file /etc/dnsmasq_static_hosts.conf you can add a list of local machines with static IP addresses in the same format as the hosts file. It is also an easy way of creating aliases or CNAME records.
    192.168.0.8  mail mail.example.com
    192.168.0.9  smtp smtp.example.com
    192.168.0.120 mythtvbox mythtvbox.example.com

    Starting and stopping the service

    sudo service dnsmasq start
    sudo service dnsmasq stop
    sudo service dnsmasq restart
Read More

0 comments:

Virtual memory helps your PC execute programs and actions quickly when you are running low on random-access memory (RAM). Virtual memory combines your RAM memory with your hard drive space. These two work together to compensate for lack of RAM and attempt to speed up your system.
For many actions RAM is directly correlated to your computer’s speed. The more RAM you have, the faster your PC will run. When doing processor-heavy tasks and running low on RAM, Windows will use hard drive space as a memory substitute. How much Windows uses virtual memory is ultimately your choice and can be set by following these directions.
Too much or too little virtual memory will decrease your system’s performance. Additionally, the speed of your hard drive in some ways will dictate how much benefit you receive from virtual memory.
Often tweaking virtual memory is not the best solution for increasing system speed. If your system is running slowly, upgrading RAM typically will provide much more benefit than virtual memory adjustments.
This tutorial was done on a Windows 7 machine, but the steps are similar on Windows 8.
1.Open up the Control Panel. This can be done by clicking on the Start button and selecting Control Panel. In Windows 8 you will want to access the classic Control Panel.
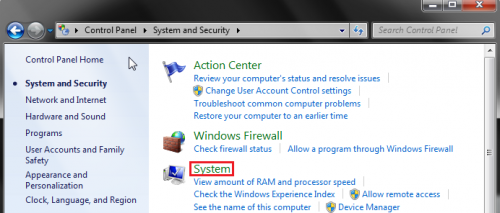
2.From the Control Panel, select System and Security
3.From the System and Security options, select System
4.Now, select Advanced system settings from the options on the left-hand side. 
5.Under System Properties, make sure that the Advanced tab is selected. Then choose Settings… under Performance.
6.From the Performance options, select the Advanced tab. Then choose Change… underVirtual memory
7.First un-check the box next to Automatically manage paging file size for all devices. Next, select the drive you want to use, and adjust the Custom size option. Hit Save, and then click OK to save your settings. 
How to configure virtual memory is highly debated among Windows experts. Many of us suggest disabling the OS’s automatic management and setting the initial and maximum size to the paging size recommended by Windows. In my example above, I would set these sizes to the suggested 1918 MB.
Users of SSD drives have a more complex problem. Since virtual memory writes to the hard drive very frequently, using SSD drives in this fashion can theoretically decrease the life of the drive. However, SSD drives are so quick that this drive style reduces a lot of the performance limitations associated with virtual memory.
Read More

0 comments:


How to increase the virtual memory size in your computer

If you receive a message in Microsoft Windows Vista, XP or 7 stating that your system is running low on virtual memory, the following steps can be performed to prevent this message from appearing and even enhance the performance of your system. To increase the size of your virtual memory, select your operating system and follow the steps below.
Windows Vista
Windows XP
Windows 7
Windows 8.1/10

Windows Vista

First, determine how much memory (RAM) you have installed on your system. To find out how much memory (RAM) you have installed on your system:
  1. Click Start, then click Control Panel.
  2. Click System and Maintenance, then click System. Under Memory (RAM), the amount of RAM you computer has will be displayed.
Increase the Virtual memory size
  1. Click Start, then click Control Panel.
  2. Double-click System and Maintenance, then click System.
  3. In the left hand menu, click Advanced system settings. If you are prompted for an administrator password, type the password.
  4. Click the Advanced tab.
  5. Under Performance, click Settings.
  6. Click the Advanced tab.
  7. Under Virtual memory, click Change.
  8. Uncheck the "Automatically manage paging file size for all drives" check box.
  9. Under Drive [Volume Label], click the drive that contains the paging file you want to change.
  10. Click Customize size.
  11. Change the Initial Size and Maximum size text boxes (these sizes are in megabytes).
  12. Click Set, then click OK.
Windows Vista sets the initial minimum size of the paging file to the amount of memory (RAM) installed on your system plus 300 MB, and the maximum size at 3 times the amount of memory (RAM) installed on your computer.
Increasing the size of virtual memory size does not usually require a restart in Windows Vista. If you decrease the size, restart the computer for the changes to take effect. Deleting or disabling the paging file is not recommended.

Windows XP

First, determine how much memory (RAM) you have installed on your system. To find out how much memory (RAM) you have installed on your system, right-click My Computer, then click properties. The amount of RAM will be displayed at the bottom under the General tab.
Increase the Virtual memory size
  1. Open My Computer.
  2. Click View system information in the left hand side of the My Computer window.

    View system information

    The System Properties window will be displayed.
  3. Click the Advanced tab. Under performance, click Settings. The Performance Options dialog box will be displayed.
  4. Under the Performance Options dialog box, click the Advanced tab.
  5. Under the Virtual memory section, click Change. The Virtual Memory dialog box will be displayed.
  6. In the Virtual Memory dialog box, change the Initial Size and Maximum size text boxes (these sizes are in megabytes).
    For example: You can change the Initial and Maximum sizes to 1.5 times the amount of RAM you have. If you had 768 MB of RAM installed on your system, you would enter 1152 MB RAM in both the Initial Size (MB) and Maximum Size (MB) text boxes.

    Virtual memory
  7. Click Set, then click OK. A message will appear stating that you will need to restart your computer. Click OK.
  8. Click OK.
  9. Click OK.
  10. You will be asked if you want to restart your computer, click Yes.

Windows 7

First, determine how much memory (RAM) you have installed on your system. To find out how much memory (RAM) you have installed on your system, right-click Computer, then click properties. The amount of RAM will be displayed at the bottom under the System.
Increase the Virtual memory size
  1. Click Start button, right-click Computer, and then click Properties.
  2. In the left pane, click Advanced system settings.
  3. On the Advanced tab, under Performance, click Settings.
  4. Click the Advanced tab, and then, under Virtual memory, click Change.
  5. Clear the Automatically manage paging file size for all drives check box.
  6. Under Drive [Volume Label], click the drive that contains the paging file you want to change.
  7. Click Custom size, type a new size in megabytes in the Initial size (MB) or Maximum size (MB) box, click Set, and then click OK.
Read More

0 comments:

Recent News