
Install CCcam on DM500
Sunday, 28 August 2016
To expand on Jeff's answer you'll need something like this in your apache configuration
**/etc/apache2/ports.conf
Listen 80
Listen 81
Listen 82

# Listen for virtual host requests on all IP addresses
NameVirtualHost *:80

<VirtualHost *:80>
DocumentRoot /var/www1
ServerName www.example1.com
</VirtualHost>

NameVirtualHost *:81
<VirtualHost *:81>
DocumentRoot /var/www2
ServerName www.example2.org
</VirtualHost>


NameVirtualHost *:82
<VirtualHost *:82>
DocumentRoot /var/www3
ServerName www.example3.org
</VirtualHost>
DMASOFTLAB Radius Manager: Installation

LAST UPDATED: 8th JANUARY , 2014
Note:
You can also use radius manager automated installation script to install RM 4.0.4 and 4.1.0
https://aacable.wordpress.com/2014/01/04/automated-installation-script-for-radius-manager-v-4-0-44-1-4-with-latest-patch/
▼▼▼
Following is a short reference guide for DMASOFTLAB Radius Manager on Ubuntu Distro
Part- 1) Installation Of RM with some TIPS,
Part- 2) Complete Backup for RM and RM DB,
Part- 3) Restore RM Data to new Installation.
▼▲▼▲▼▲▼▲▼▲▼▲▼▲▼▲▼▲▼▲▼▲▼▲▼▲▼▲▼▲▼▲▼▲▼▲▼▲▼▲▼▲▼▲▼▲▼▲▼▲▼▲▼▲▼▲▼▲▼▲▼▲▼▲▼▲▼▲▼▲▼▲
PERSONNEL NOTE:Please be informed that you can get better installation instructions in details from DMASOFTLAB official manual. This guide is a extracted version of original manual with my custo modifications. Please consult with the original manual and DMA helpdesk for official support. I have no affiliation with the DMA, its just my personnel experience you are reading in this guide. It can be wrong, or might not be working as per your requirements. Just drop me an message or email for any correction or modification if required.aacable [at] hotmail.comThank you
Syed Jahanzaib
▼▲▼▲▼▲▼▲▼▲▼▲▼▲▼▲▼▲▼▲▼▲▼▲▼▲▼▲▼▲▼▲▼▲▼▲▼▲▼▲▼▲▼▲▼▲▼▲▼▲▼▲▼▲▼▲▼▲▼▲▼▲▼▲▼▲▼▲▼▲▼▲
.
.
▼▲▼▲▼▲▼▲▼▲▼▲▼▲▼▲▼▲▼▲▼▲▼▲▼▲▼▲▼▲▼▲▼▲▼▲▼▲▼▲▼▲
Part-1 # Installation of Radius Manager 4.x on Ubuntu 10.4 [32/64 bit versions]
▼▲▼▲▼▲▼▲▼▲▼▲▼▲▼▲▼▲▼▲▼▲▼▲▼▲▼▲▼▲▼▲▼▲▼▲▼▲▼▲▼▲
DMASOFTLAB Radius Manager 4.0 Short reference manual guide for UBUNTU 10.4 *** 32 /64 Bit Version
If you have 64bit OS, then you have to download compatible 64bits packages from the dmasoftlab download section, just note down the 32bit files in this guide, and download 64bit version of same package from the DMA page.
After you have installed Ubuntu, configure IP address and enable internet access on it.
Now open Terminal Window and issue the below command to install required Modules. but make sure you do update ubuntu before doing any further process.
Create temp directory where you will download things
1
2
3
4
5
6
7
8
9
10
11
12
13
14
15
16
| mkdir /tempcd /tempapt-get updateapt-get install mc wget rcconf make gcc mysql-server mysql-client libmysqlclient15-dev libperl-dev curl php5 php5-mysql php5-cli php5-curl php5-mcrypt php5-gd php5-snmp### For 32bit Only, download following two items and install themdpkg -i libltdl3_1.5.24-1ubuntu1_i386.debdpkg -i libltdl3-dev_1.5.24-1ubuntu1_i386.deb### For 64bit Only, download following two items and install themdpkg -i libltdl3_1.5.26-1ubuntu1_amd64.debdpkg -i libltdl3-dev_1.5.26-1ubuntu1_amd64.deb |
IONCUBE Installation:
Now Download ioncube library
1
2
3
4
5
| ### For 32bit### For 64bit |
Untar it in any temp folder for example /temp/ioncube
1
2
3
4
5
| ### For 32bittar zxvf ioncube_loaders_lin_x86.tar.gz### For 64bittar zxvf ioncube_loaders_lin_x86-64.tar.gz |
Create new folder for ioncube in usr/local
1
| mkdir /usr/local/ioncube |
and copy the whole folder in /usr/local
1
2
| cd /temp/ioncubecp * /usr/local/ioncube/ |
Now Add the appropriate ionCube loader to your php.ini
e.g: in following files.
1
2
| echo "zend_extension=/usr/local/ioncube/ioncube_loader_lin_5.3.so" >> /etc/php5/apache2/php.iniecho "zend_extension=/usr/local/ioncube/ioncube_loader_lin_5.3.so" >> /etc/php5/cli/php.ini |
.
.
.
Installation procedure of FreeRadius
1
2
3
4
5
6
7
8
9
10
11
12
13
| cd /temptar zxvf freeradius-server-2.2.0-dma-patch-2.tar.gzcd freeradius-server-2.2.0/### Now proceed with the compilation of FREERAIDUS , applicable for all./configuremakemake installldconfig |
↓
Now test RADIUS by issuing following command:
1
| radiusd -X |
You will see something like below . . .

++++++++++++++++++++++++++++++++++++++++++++++++++++++++++++++++++++++++
TIP: After issuing make command , if you see errors like below
gcc -o .libs/radeapclient .libs/radeapclient.o libeap/.libs/libfreeradius-eap.so -lnsl -lresolv -lpthread
/usr/bin/ld: .libs/radeapclient.o: undefined reference to symbol ‘fr_perror’
/usr/bin/ld: note: ‘fr_perror’ is defined in DSO /root/freeradius-server-2.1.8/src/lib/.libs/libfreeradius-radius-2.1.8.so so try adding it to the linker command line
/root/freeradius-server-2.1.8/src/lib/.libs/libfreeradius-radius-2.1.8.so: could not read symbols: Invalid operation
collect2: ld returned 1 exit status
make[6]: *** [radeapclient] Error 1
make[6]: Leaving directory `/root/freeradius-server-2.1.8/src/modules/rlm_eap’
make[5]: *** [common] Error 2
make[5]: Leaving directory `/root/freeradius-server-2.1.8/src/modules’
make[4]: *** [all] Error 2
make[4]: Leaving directory `/root/freeradius-server-2.1.8/src/modules’
make[3]: *** [common] Error 2
make[3]: Leaving directory `/root/freeradius-server-2.1.8/src’
make[2]: *** [all] Error 2
make[2]: Leaving directory `/root/freeradius-server-2.1.8/src’
make[1]: *** [common] Error 2
make[1]: Leaving directory `/root/freeradius-server-2.1.8′
make: *** [all] Error 2
To solve this this problem,Add followign directive
-lfreeradius-radius-2.1.8
in freeradius-server-2.1.8/src/modules/rlm_eap/Makefile .
Open it in nano/vi or any text editor by,
Open it in nano/vi or any text editor by,
1
| nano freeradius-server-2.1.8/src/modules/rlm_eap/Makefile |
Before editing
1
| $(LIBTOOL) –mode=link $(CC) $(LDFLAGS) $(RLM_LDFLAGS) -o radeapclient radeapclient.lo $(CLIENTLIBS) $(LIBS) $(OPENSSL_LIBS) |
After editing done
1
| $(LIBTOOL) --mode=link $(CC) $(LDFLAGS) $(RLM_LDFLAGS) -lfreeradius-radius-2.1.8 -o radeapclient radeapclient.lo $(CLIENTLIBS) $(LIBS) $(OPENSSL_LIBS) |
Save & Exit.
now run make and make install again.
1
2
| makemake install |
++++++++++++++++++++++++++++++++++++++++++++++++++++++++++++++++++++++++
Set the correct ownership on FreeRadius configuration files
================================================
================================================
1
2
| chown www-data /usr/local/etc/raddbchown www-data /usr/local/etc/raddb/clients.conf |
TIP:
Review and edit (if required) the MySQL credentials in /usr/local/etc/raddb/sql.conf (Just in case you have mentioned different password/id for mysql)
.
Creating MySQL databases with MySQL command line tool
===============================================
===============================================
1
2
3
4
5
6
7
8
9
| mysql -u root -ppasswordCREATE DATABASE radius;CREATE DATABASE conntrack;CREATE USER 'radius'@'localhost' IDENTIFIED BY 'yourpass';CREATE USER 'conntrack'@'localhost' IDENTIFIED BY 'yourpass';GRANT ALL ON radius.* TO radius@localhost;GRANT ALL ON conntrack.* TO conntrack@localhost;exit |
↓
==================================
Time to Install RADIUS MANAGER 4.0.4
==================================
Time to Install RADIUS MANAGER 4.0.4
==================================
↓
Copy the radius manager radiusmanager-4.0.4.tgz (or your version) in any temp folder
now extract it using
now extract it using
1
2
3
| tar zxvf radiusmanager-4.0.4.tgzcd radiusmanager-4.0.4/chmod +x install.sh |
↓
↓
Start RADIUS MANAGER Installation script
Execute the installation Script . . .
(If you are new to radius manager installation, use default password scheme, it will save you from few headaches, BUT later on as you will get familiar with the system, CHANGE the default passwords as its risk to use default password)
1
| ./install.sh |
Now the install script will ask few questions . . . Select answers as per your local design.
For example:
Select the Operating System
2
(For Ubuntu)
Select the Operating System
2
(For Ubuntu)
Select Installation type:
1(New Installation)
1(New Installation)
WWW root path:
Press Enter to select the Default , which is /var/www
Press Enter to select the Default , which is /var/www
Radius Database host:
Press Enter to select the Default , which is localhost
Press Enter to select the Default , which is localhost
Radius Database username:
Press Enter to select the Default , which is radius
Press Enter to select the Default , which is radius
Radius Database password:
Press Enter to select the Default , which is radius123
Press Enter to select the Default , which is radius123
CTS Database host:
Press Enter to select the Default , which is localhost
Press Enter to select the Default , which is localhost
CTS database username:
Press Enter to select the Default , which is conntrack
Press Enter to select the Default , which is conntrack
CTS database password:
Press Enter to select the Default , which is conn123
Press Enter to select the Default , which is conn123
Freeradius UNIX User:
Press Enter to select the Default , which is root
Press Enter to select the Default , which is root
Httpd Unix User:
Press Enter to select the Default , which is www-data
Press Enter to select the Default , which is www-data
Create rmpoller service:
Press Enter to select the Default , which is y (yes)
Press Enter to select the Default , which is y (yes)
create rmconntrack service:
Press Enter to select the Default , which is y (yes)
Press Enter to select the Default , which is y (yes)
Backup Radius database:
Press Enter to select the Default , which is y (yes)
Press Enter to select the Default , which is y (yes)
Now it will ask if you want to start the installation
Press y and press ENTER to continue the installation.
Press y and press ENTER to continue the installation.
↓
and at the end you will INSTALLATION COMPLETE!
↓
As showed in the image below . . .
As showed in the image below . . .
 ↓
↓
↓
Now copy the two license files (that you receive from DMASOFTLAB) in /var/www/radiusmanager
lic.txt
mode.txt
mode.txt
↓
Now access the admin panel from your browser
As showed in the image below . . .

.
 ↓
↓
↓
Adding NAS (Mikrotik) in Radius Manager + Mikrotik Radius Configuration for RM
RADIUS MANAGER SECTION:
Login to Administration Control Panel (ACP) of RM.
Goto NAS / NEW
Fill the required info, Like Mikrotik name, IP address, Secret
As showed in the image below . . .
Goto NAS / NEW
Fill the required info, Like Mikrotik name, IP address, Secret
As showed in the image below . . .

 .
.
.
.
.
▼▲▼▲▼▲▼▲▼▲▼▲
MIKROTIK SECTION
▼▲▼▲▼▲▼▲▼▲▼▲
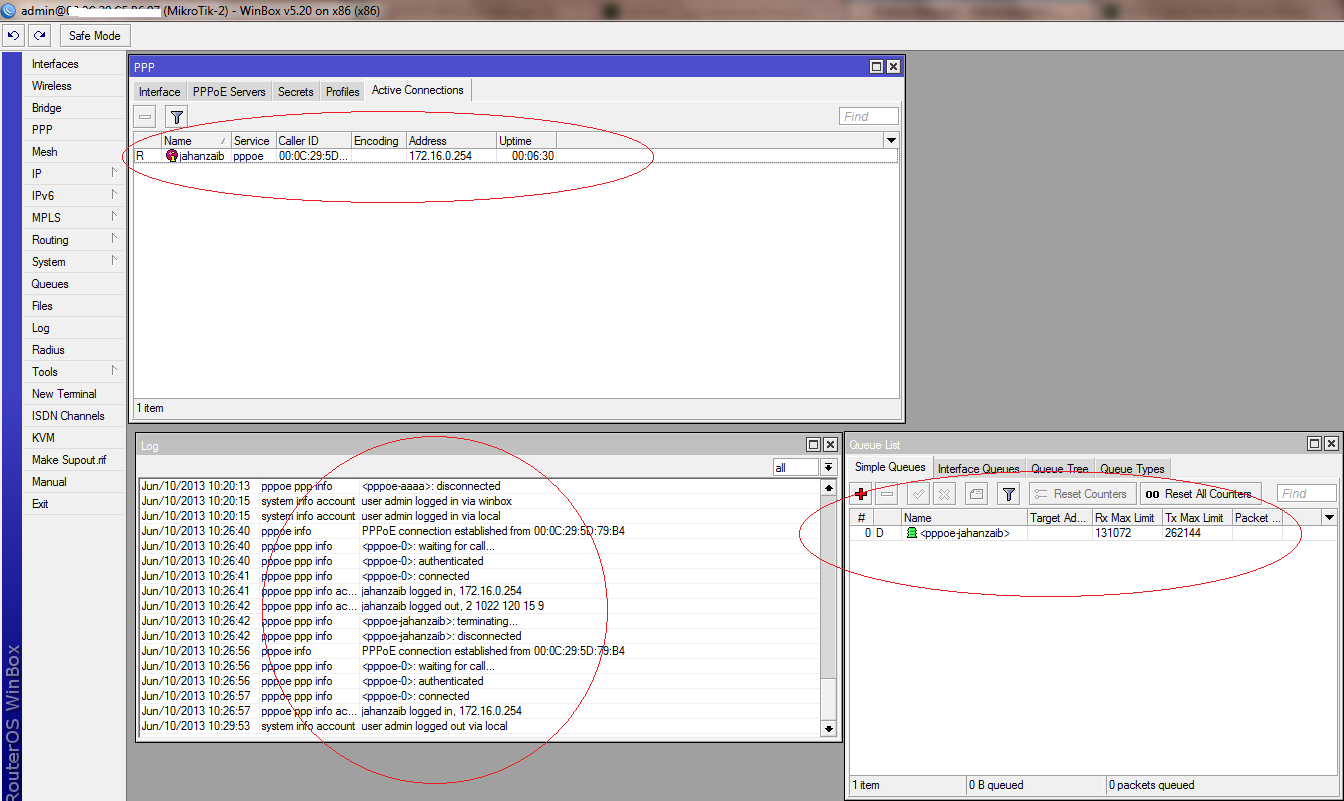
Now Login to Mikrotik,
Goto PPP Section
Click on PPP Authentication & Accounting
Click on Use Radius
As showed in the image below . . .
Goto PPP Section
Click on PPP Authentication & Accounting
Click on Use Radius
As showed in the image below . . .


Now create any user in RM, and connect it from client end using pppoe (or test it via radtest).
Examples.

.

TIPS:
.

Testing Radius via radtest
First edit
/etc/hosts
and change the system name to local host ip i.e 127.0.0.1as showed in the example below. . .

Don’t forget to restart radiusd after making changes to the NAS list!
service radiusd restart
Now issue following commands to test.
1
| radtest user 1111 127.0.0.1 1812 testing123 |
and you may see following. (with access-accept)

Various Errors & Troubleshooting . . .
↓
1# : IF YOU ARE USING CUSTOM PASSWORD (NOT DEFAULT)
If you see the following error while accessing admin.php
Could not connect to localhost
 If you are using your own password (other then default password of rm, ) then Make sure your passwords for radius and conntrack hosts are set correctly in
1
2
3
4
5
| /etc/radiusmanager.cfg/var/www/radiusmanager/config/system_cfg.php/usr/local/etc/raddb/sql.conf |
↓
↓
2# :Blank page is showing while accessing admin.php
If you see blank page while accessing admin.php , following could be wrong.
a- Your license files are not valid or expired.
b- you have not installed ioncube library correctly.
a- Your license files are not valid or expired.
b- you have not installed ioncube library correctly.
To test if your license is valid, tail the /var/log/apache2/access.log and error.log , they will show you if your license have issues like expired or invalid dueto mac address restrictions.
To test IONCUBE LIBRARY , Open Terminal and Type
1
| php -v |
& you should see something similar to below . . . (Focus on Last line that says with the ioncube php loader . . .)
root@zaib-desktop:~# php -v
1
2
3
4
| PHP 5.3.2-1ubuntu4.18 with Suhosin-Patch (cli) (built: Sep 12 2012 19:33:42) Copyright (c) 1997-2009 The PHP Group Zend Engine v2.3.0, Copyright (c) 1998-2010 Zend Technologies with the ionCube PHP Loader v4.2.2, Copyright (c) 2002-2012, by ionCube Ltd. |
↓
3# : Incorrect User name & Passowrds in Mikrotik LOG
you are seeing ‘Incorrect user name and password error’ in mikrotik logs for the users created on RM, then make sure you have defined correct password in /usr/local/etc/raddb/sql.conf
↓
4# : NAS NOT FOUND in RADTEST
If you see NAS NOT FOUND in radtest, please see the heading “Testing Radius via radtest“.
If the hostname is different than localhost, (like you have some other hostname name for the machine e.g: radius, then
Edit
/etc/hosts
and change the system name to local host ip i.e 127.0.0.1
As showed in the example below . . .
Don’t forget to restart radiusd after making changes to the NAS list!
1
| service radiusd restart |
↓
↓
↓
↓
↓
↓
↓
▼▲▼▲▼▲▼▲▼▲▼▲▼▲▼▲▼▲
Part-2 # COMPLETE BACKUP
▼▲▼▲▼▲▼▲▼▲▼▲▼▲▼▲▼▲
Use the following link to get the backup script.
Or use the manual method
To take full backup use the following.
Create backup folder in root /
1
| mkdir /backup |
Now copy whole contents of following folders ,
1
2
3
4
| /etc/usr/local/var/www/var/lib/mysql |
TIP: You can use following commands to copy whole contents and zip it
1
| tar cfz /backup/myrmbackup.tgz /etc /home/root /usr/local /var/www /var/lib/mysql |
You can schedule it run on daily basis.
Now Create mysql dump of mysql database of DB RADIUS
(which have RM User and other Data)
(which have RM User and other Data)
1
2
| mysqldump -u radius -pRADIUSPASSWORD radius > /backup/db_full_type_current_date.sqlgzip -f /backup/db_full_type_current_date.sql |
(Tip# To unzip the .gz file, use gzip -d filename.gz )
▼
▼
▼
▼
▼
▼
▼
▼▲▼▲▼▲▼▲▼▲▼▲▼▲▼▲▼▲
Part-3 # RESTORE FROM BACKUP
▼▲▼▲▼▲▼▲▼▲▼▲▼▲▼▲▼▲
If somehow your server crashes, and you got to re-built it from scratch , you can restore the database using below procedure. (To simplify things, use the same OS)
1) Install OS (Same as previous one, in this example Ubuntu)
2) Install RM with the same same config you used for previous installation, e.g: radius db passwords and folders locations
3) Restore all the folders from the backup to there original locations.(backup that taken in part-2 backup part)
by using command in / folder (main root folder)
2) Install RM with the same same config you used for previous installation, e.g: radius db passwords and folders locations
3) Restore all the folders from the backup to there original locations.(backup that taken in part-2 backup part)
by using command in / folder (main root folder)
tar zxvf full_data.tgz (or file name)
4) Now its time to restore mysql radius DB, use the below command to restore DB in mysql.
1
| mysql -u root -prootpassword radius < db_full_type_current_date.sql |
Change the db_full_type_current_date.sql to match your mysql backup file.
Now restart your box onc time.
If you receive ‘cannot connect to localhost‘ check the passwords in
1
2
3
| /etc/radiusmanager.cfg/var/www/radiusmanager/config/system_cfg.ph/usr/local/etc/raddb/sql.conf |
▼
▼
Also check the DB password for user radius in mysql , You can change the DB password via using this command
1
2
3
4
5
| mysql -u root -pYOURPASSWORDuse mysql;SET PASSWORD for 'radius'@'localhost' = PASSWORD('radius123');# MORE EXAMPLE for RADIUS MANAGER RELATEDSET PASSWORD for 'conntrack'@'localhost' = PASSWORD('conn123'); |
▼
▼
Now restart your box and hopefully everything will be restored back to normal
.
.
.
▼▼▼▼▼▼▼▼▼▼▼▼▼▼▼▼▼▼▼▼▼▼▼▼▼▼▼▼▼▼▼▼▼▼▼▼▼▼
Some TiPS For Customizations . . .
▲ ▲ ▲ ▲ ▲ ▲ ▲ ▲ ▲ ▲ ▲ ▲ ▲ ▲ ▲ ▲ ▲ ▲ ▲ ▲ ▲ ▲ ▲ ▲ ▲ ▲ ▲ ▲ ▲ ▲ ▲
Howto Configure Email notifications
To configure Email server, edit following,
/var/www/radiusmanager/config/system_cfg.php
Goto SMTP section, and modify it as per your local SMTP server/user/domain.
Example:
Example:
1
2
3
4
5
6
7
8
9
10
11
| // SMTP definitionsdefine('smtp_relay', '1.2.3.4'); // SMTP relaydefine('smtp_port', 25); // SMTP portdefine('smtp_auth', FALSE); // SMTP authenticationdefine('smtp_user', 'syed.jahanzaib'); // SMTP user namedefine('smtp_psw', 'my_pass'); // SMTP passworddefine('mail_from', 'zaib@xyz.com'); // sender addressdefine('mail_fromname', 'Syed Jahanzaib'); // sender namedefine('mail_newuser', 'zaib@xyz.com'); // self registered new user notificationdefine('mail_localdomain', 'xyz.com'); // default domain name |
Now configure some settings in ACP / Systems / Ssytem Settings

.
.
.
HOWTO REPLACE/MODIFY DMASOFTLAB RM LOGO and TEXT !!!
You can Replace/Edit the default DMASOFTLAB logo files. by default, Images are available where you have installed the radiusmanager. Look into the images folder of radiusmanager.
For example I installed RM in /var/www/html/radiusmanager. There will be a folder name ‘images’ Look for these files.
dmalogo_small.gif
radmanlogo_small.gif
main1_01.gif
main1_02.gif
main1_03.gif
emailheader.gif
radmanlogo_small.gif
main1_01.gif
main1_02.gif
main1_03.gif
emailheader.gif
↓
.
.
.
Edit Various Text/headings Show at UCP/ACP
You can also edit the texts/descriptions in language description files in radiusmanager/lang/english folder.
look for texts.txt and strings.txt
look for texts.txt and strings.txt
↓
.
.
.
To Add Logo in Prepaid Cards
You can modify its base image at radiusmanager/lang/english/card folder.
look for classic_bg.png and refill_bg.png
look for classic_bg.png and refill_bg.png
To add logo in prepaid classic cards, copy classic_bg.png to your windows desktop, Edit it in any image editing software (I used MS Paint Brush default), add Your logo , Save this file in .jpgextension like classic_bg.jpg , now upload this file back to radiusmanager/lang/english/card
Now edit following file,
/var/www/radiusmanager/config/system_cfg.php
and rename the classic_bg.png to > classic_bg.jpg ,
As showed in the image below …

Save & Exit.
Now generate your cards, and you will see your logo shining

.
.
To clear LOGS in RM ACP [last syslog events]
1
| mysql -uroot -pSQLPASSWD -e "truncate rm_syslog" radius |
.
.
PHP Warning: main(config/payfast_cfg.php): failed to open stream: No such file or directory in /var/www/radiusmanager/user.php on line 0
If you received following error
PHP Warning: main(config/payfast_cfg.php): failed to open stream: No such file or directory in /var/www/radiusmanager/user.php on line
Just rename the following file
/var/www/radiusmanager/config/payfast_cfg.php.dist
to
/var/www/radiusmanager/config/payfast_cfg.php
.
.
Simultaneous Session config for user in Mikrotik/RM
If you want to allow simultaneous session for specific Users …
1- Set SHARED USERS option in User Profile to required number of simultaneous users … As showed in the image below …

2- In USER EDIT properties, modify the number of simultaneous users you want to allow (specific User or Group) … As showed in the image below …

3- Now test by login same ID with 2 computers … As showed in the image below …

.
.
.
Modify Country Listing
To modify country list appear in the country list, you can modify following file
/var/www/radiusmanager/config/system_cfg.php
Look for // Country List, and modify it as per requirements, Modified Example is below …

.
Save, Exit, and reload RM ACP page, and you will see new country listing in the list.
AP’S STOPS SHOWING SIGNALS IN ONLINE USERS
If AP’s Signals stops showing in Online Users, try
Delete the stale lockfile (/tmp/wlanpoller.pid).
Allow Special characters in Username / Passwords
By default special characters are not allowed even dash, at the rate sign etc. To allowt hem open the config file (in ubuntu path is following,
nano /var/www/radiusmanager/config/system_cfg.php
for centos user,
nano /var/www/html/radiusmanager/config/system_cfg.php
and
Search following
1
2
3
4
5
6
7
8
9
10
11
12
13
| regexp_usernameregexp_managernameregexp_pswand replace old values with followingdefine('regexp_username', '/^[a-z0-9._!@#$%&*]+$/'); // regular expression for validating user namesdefine('regexp_managername', '/^[a-z0-9._!@#$%&*]+$/'); // regular expression for validating manager namesdefine('regexp_psw', '/^[a-zA-Z0-9._!@#$%&*]+$/'); // regular expression for validating passwords |
Save and exit. and reload the admin page in browser.
Radius LOGS
/usr/local/var/log/radius
To be continued . . .
Allah Hafiz
.
Regard’s
Syed Jahanzaib
aacable [at] hotmail.com
Syed Jahanzaib
aacable [at] hotmail.com
To deploy Radius Manager Patch 5 (4.1.5) , Kindly see the following Link


0 comments: